|
|
Learning method
The mouse is a round plastic instrument provided with the computer. Underneath is a small ball, and on the top are two keys. Once connected to the computer (connect it before starting computer, otherwise it will not be recognised), if a valid hand moves the mouse on a flat area, the mouse’s cursor carries around the screen. This mouse is very helpful. Press the left key is clicking (![]() ), and press it twice is double clicking (
), and press it twice is double clicking (![]() ). As SwitchXS users cannot manage the mouse, SwitchXS does it for them with mouse keys on the scanning panel. Let us now analyse these keys, on the first two rows of the Keyboard and Mouse bis scanning panel.
). As SwitchXS users cannot manage the mouse, SwitchXS does it for them with mouse keys on the scanning panel. Let us now analyse these keys, on the first two rows of the Keyboard and Mouse bis scanning panel.
First go to : SwitchXS / Preferences / Mouse
And tick “End with slow mouse”, it makes things much easier : if you want to put the mouse’s cursor at a specific place on the screen, as the cursor arrives near that place, you switch a first time, the cursor goes slower, you switch again, the cursor stops. If you go too far, you can reverse to bring the cursor at the exact place., as wanted.
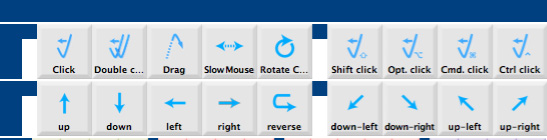
On the first row, from left to right :
Click : lets you select a file or folder in the Finder on which the mouse cursor is ; or on a web page, click on a link (see chapter Internet) ; or in a text, change the text cursor’s place, etc…
Double click : lets you open a file in the Finder or on the desktop by double clicking it ; in a text, double clicking a word shades it, so you can change the word by typing another one on top.
Drag : if you put the mouse cursor on a file or folder, in the Finder, and then you type “Drag”, you can move this file or folder to another folder, and then type “Drag” again, which “Drops” it in that other folder : this operation is called “Drag and Drop”, very useful to change place files and folders in the Finder. With that “Drag” key, you can also change place a window on the screen, or change its size, with the same method. In a text, you can shade a part, then copy it to paste it somewhere else.
Slow mouse : when typing this key, the mouse cursor moves in same direction as previously, but slowly. You can define slow rate in the Mouse section of SwitchXS preferences.
Rotate cursor : when typing this key, you see a ray turning clockwise, having origin the mouse cursor. Switching a first time makes the ray turn slower, switching a second time makes the ray stop turning and the mouse cursor move along the ray, switching a third time, makes the cursor move slower in the same direction, switching a fourth time, makes the cursor stop. It is the fastest way to bring mouse cursor from a point to another on the screen.
Shift Click : typing that key is the same as typing first “Shift”, then “Click” and again “Shift”. It lets you select several files in the Finder or a part of text. You select a file in the Finder, when you Shift-Click another file of the same list, all files between both files are selected. Same for text : put the text cursor in a place, Shift-Click another place, all the text between both places is selected.
Option Click : when a whole list of files is selected in the Finder, Option-Clicking one of those files, makes that no files are selected, expect the one on which you clicked. But the main application concerns a very long text in which you know approximately where you want to go. Option-Clicking the right rail makes the blue target place itself where you click, it is much faster than typing “Page Down”.
Command Click : when several files are selected in a list of the Finder, you can make the file not selected, keeping the other ones selected, by Command-Clicking it. With that key, you can also select desired files, without selecting those between.
Control Click : Control clicking on an icon of the dock, on a file in the Finder or on certain parts of a web page, makes a local menu appear, then with the up and down arrows, you can select a task which is done when typing Return.
On the second row, from left to right :
The first four keys are mouse movements in the four directions : up, down, left and right. When selecting one of those keys, the mouse cursor moves in the selected direction, at the speed chosen in the Mouse section of SwitchXS Preferences, switching a first time, makes the cursor go slower (determine slow speed in SwitchXS preferences), switching again, stops cursor.
Reverse : when the mouse cursor goes too far, using that key enables you to go backwards, in the same direction, with slow speed.
The last four keys are diagonal mouse movements. Once more, it starts rapidly, then after a switch, at slow speed, and stops when switching a second time.
There is one more mouse action done by the last key, third row: “Move scan panel window”. When you type it, you see an arrow turning in clockwise, at the first switch, the arrow turns in slow speed, at the second switch, the panel moves in the arrow’s direction, at the third switch, the panel goes on moving in same direction but in slow speed, and at fourth switch, panel stops. This is more convenient than ticking the “SmartTransparency” case in SwitchXS preferences, then moving the panel window by “Drag and Drop”, and ticking again the “SmartTransparency” case in SwitchXS preferences.