|
|
Learning method
With SwitchXS, we have plenty of scanning panels done by the author, but we have also possibility to make our own panels, with LayoutKitchen, a panel editor software, provided with SwitchXS, it’s the great strength of SwitchXS. For those done by the author, be careful of those with no cross (+) in the name, for they do not have a “default” key (to change for the default panel, which you define in the SwitchXS preferences), so you cannot change panel without somebody helping. Personally, I prefer doing my own panels according to my needs which allows me to save time.
I propose you download the following panel, "Keyboard and Mouse bis", by clicking the link “Download Keyboard and Mouse bis.spnl”, and then you put the downloaded file (either by “Drag and Drop” or by “Copy and Paste”, see chapters “Files and Folders” and “Finder”) in :
Home / Library / Application Support / Assistiveware Support / SwitchXS Scan Panels
If it is not in the Panel menu of SwitchXS, you have to put it in. Open the downloaded file (either by double clicking, either by selecting it and then typing “Command O” (![]() ) keyboard shortcut), the LayoutKitchen application opens, and then the Keyboard and Mouse bis panel. Then in the View menu, choose “Panel Properties”, in the opened window, click the little triangle before “Advanced settings”. In the popup menu, choose “Multilingual” and “Do not show in menu” must be ticked off , then click “OK” or type Return. You will not see the name appear in the Panel menu of SwitchXS if you do not save by typing “Command S”(
) keyboard shortcut), the LayoutKitchen application opens, and then the Keyboard and Mouse bis panel. Then in the View menu, choose “Panel Properties”, in the opened window, click the little triangle before “Advanced settings”. In the popup menu, choose “Multilingual” and “Do not show in menu” must be ticked off , then click “OK” or type Return. You will not see the name appear in the Panel menu of SwitchXS if you do not save by typing “Command S”(![]() ) keyboard shortcut.
) keyboard shortcut.
Then you can decide that this panel is the “Default” one. This allows you, when SwitchXS does not know which panel choose, to take the default, which you determine in the “General” of the SwitchXS preferences.
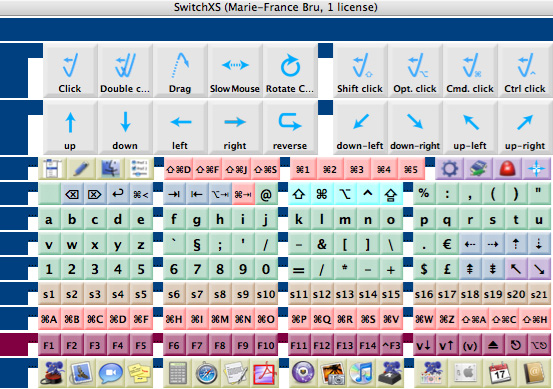
Explanation of Keyboard and Mouse bis panel above : the first two rows are mouse movements, see chapter “Mouse”.
Colours : dark blue keys do nothing, they just help to make scanning easier, for when you have a fast scanning, all the firsts are difficult to reach, first row, first column of a row, and first key of a column ; this is why I prefer making keyboards with all firsts doing nothing. For those who prefer a keyboard without those dark blue keys doing nothing, they can download "Keyboard and Mouse ter", which is exactly the same panel, without those keys doing nothing.
In SwitchXS preferences / Scanning, you can introduce a latent period for all firsts, which helps a lot, even if you have those dark blue keys.
When you switch a first time, scanning starts row after row, a second switch selects the row and makes scanning column after column in that row, a third switch selects the column and makes the scanning key after key in that column, and finally a fourth switch selects the right key. As you see, that scanning system is rather slow, and if you write typing letter after letter, without an accelerating method, you take hours to write three lines! I have a writing method which I recommend, all is explained on this web site.
- Green keys are the letters, the numbers and all sorts of signs, they type exactly what is written on the key.
- Blue keys are tasks that go on repeating until you switch.
- Red keys are keyboard shortcuts (see chapter Keyboard Shortcuts).
- Purple keys are the Function keys (Fi), useful for keyboard shortcuts.
- Brown keys are the word prediction suggestions that work with KeyStrokes software, I inclose them for I cannot imagine somebody writing with no accelerating method, but in this case, you need to buy KeyStrokes (see “How I write”).
- Blue turquoise keys are the modifier keys, essentially for capitals and keyboard shortcuts.
- Gold keys serve to open applications, open the application preferences, pass to another panel, and scan the menu.
- Bright green keys are tasks often used.
Description key after key.
Third row, from left to right. The first four keys are gold : scan menu, pass to the writing panel (see “How I write”), open the Finder (to make it work, download the scipt, and put it in :
Home / Scripts
Then open LayoutKitchen application, and indicate the path to find this script, all is explained in the “Script” section of “Making scanning panels II”), and open the preferences. The next four keys are keyboard shortcuts useful in the Mail application or others : from left to right, send the e-mail, forward the e-mail, mark this e-mail as junk/not junk, save as, useful in most applications to change a file’s name. Then come five keyboard shortcuts useful in many applications, as Mail, Safari, LayoutKitchen… The last four keys are purple : Toggle Automation (to activate abbreviation launching), Toggle Learning, in the word prediction (as you type, word prediction remembers the words or groups of words you use, and suggests them when you start writing them again), the alarm key: sound goes louder and louder, and stops when you switch, the last key moves the panel. Of course the first two purple keys need KeyStrokes software.
Fourth row, from left to right : Space key, Backspace key, Delete Forward key, Return key, and a keyboard shortcut “Command <” (![]() ) to change window in the same application. Then come Tab, Shift Tab, Option Tab (these three keys are useful on web pages to pass from link to link, see chapter Tricks), Command Tab (
) to change window in the same application. Then come Tab, Shift Tab, Option Tab (these three keys are useful on web pages to pass from link to link, see chapter Tricks), Command Tab (![]() ) to pass to the previous application, and the “@” symbol for email addresses. Then come a series of symbols used very often.
) to pass to the previous application, and the “@” symbol for email addresses. Then come a series of symbols used very often.
Fifth row are the alphabetical letters from “a” to “u”.
Sixth row are the alphabetical letters from “v” to “z”, a series of symbols, Full stop for it is long to write it if you have to start by typing “Shift”, the “€” symbol, and arrows in the four directions (![]() ,
, ![]() ,
, ![]() ,
, ![]() ) to move in a text or to select a file in the Finder.
) to move in a text or to select a file in the Finder.
Seventh row are the numbers, a series of operation symbols, "$" "£", and at the end “Page Up”, “Page Down” (![]() ), “Home” which puts you at the beginning of the text, and “End” which puts you at the end of the text.
), “Home” which puts you at the beginning of the text, and “End” which puts you at the end of the text.
Note : I suggest you spend time to see all the symbols you can obtain with Shift, Option and Shift-Option keys.
Eighth row is a series of suggestions for word prediction. If you do not have KeyStrokes, you can take this row off with LayoutKitchen. If you have KeyStrokes, open its preferences and in “Auto-type” tick “Append space following predicted items”, so that when you type a suggestion, you do not need to type the space after the word.
Ninth row is a series of keyboard shortcut often used (see chapter Keyboard Shortcuts to know what they do), the last three ones are to open the Applications, Computer and Home folders in the Finder.
Tenth row is the function keys Fi, the “Control F3” (^F3) keyboard shortcut to select the Finder icon in Dock, Decrease Volume and Increase Volume keys, Mute key, Eject key to eject a disk from computer, Escape key to cancel a task in a dialogue window, and the “Option Command Escape” keyboard shortcut to open the “Force Quit” window.
Eleventh and last row is a series of keys that open applications of the Mac OS X operating system, as for the others, you can put their icons in the Dock (see chapter Dock), or change the keys with the LayoutKitchen application (see chapter “Making Scanning Panels I”). From left to right the applications are : SwitchXS, Mail, iChat, Stickies, Calculator, Safari, TextEdit, Acrobat Reader (to read pdf files, if you do not have it, you can download it from
and then show the path to reach it with LayoutKitchen,(see chapter “Making Scanning Panels II”), Internet Connect (if you have a simple phone connection via modem), iPhoto, iTunes, KeyStrokes, LayoutKitchen, System Preferences, iCal and Address Book.
Note : if some of these applications do not open, you have to show your computer how to reach them, with LayoutKitchen (see chapter “Making Scanning Panels II”). I also suggest you change the applications you do not use.